Putting it all together
One of the many great parts of React is how it makes you think about apps as you build them. In this document, we’ll walk you through the thought process of building a searchable product data table using React.
### Start With A Mock
The mock looks like this:
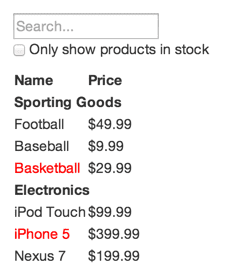
Our JSON API returns some data that looks like this:
[
  {category: "Sporting Goods", price: "$49.99",     stocked: true, name: "Football"},
  {category: "Sporting Goods", price: "$9.99",     stocked: true, name: "Baseball"},
  {category: "Sporting Goods", price: "$29.99",     stocked: false, name: "Basketball"},
  {category: "Electronics", price: "$99.99", stocked:     true, name: "iPod Touch"},
  {category: "Electronics", price: "$399.99", stocked:     false, name: "iPhone 5"},
  {category: "Electronics", price: "$199.99", stocked:     true, name: "Nexus 7"}
];
Step 1: Break The UI Into A Component Hierarchy
-
The first thing you’ll want to do is to draw boxes around every component (and subcomponent) in the mock and give them all names.
-
But how do you know what should be its own component? Use the same techniques as single responsibility principle, that is, a component should ideally only do one thing. If it ends up growing, it should be decomposed into smaller subcomponents.
-
Separate your UI into components, where each component matches one piece of your data model.

-
Components that appear within another component in the mock should appear as a child in the hierarchy:
* FilterableProductTable
  * SearchBar
  * ProductTable
    * ProductCategoryRow
    * ProductRow
Step 2: Build A Static Version in React
-
The easiest way is to build a version that takes your data model and renders the UI but has no interactivity. It’s best to decouple these processes because building a static version requires a lot of typing and no thinking, and adding interactivity requires a lot of thinking and not a lot of typing. We’ll see why.
-
To build a static version of your app that renders your data model, you’ll want to build components that reuse other components and pass data using props.
-
At the end of this step, you’ll have a library of reusable components that render your data model.
Step 3: Identify The Minimal (but complete) Representation Of UI State
-
To build your app correctly, you first need to think of the minimal set of mutable state that your app needs. The key here is DRY: Don’t Repeat Yourself. Figure out the absolute minimal representation of the state your application needs and compute everything else you need on-demand.
-
to figure out which piece of data is state. Ask three questions about each piece of data:
- Is it passed in from a parent via props? If so, it probably isn’t state.
- Does it remain unchanged over time? If so, it probably isn’t state.
- Can you compute it based on any other state or props in your component? If so, it isn’t state
Step 4: Identify Where Your State Should Live
-
follow these steps to figure it out which component should own what state :
- Identify every component that renders something based on that state.
- Find a common owner component (a single component above all the components that need the state in the hierarchy).
- Either the common owner or another component higher up in the hierarchy should own the state.
- If you can’t find a component where it makes sense to own the state, create a new component solely for holding the state and add it somewhere in the hierarchy above the common owner component.
Step 5: Add Inverse Data Flow
- Let’s think about what we want to happen. We want to make sure that whenever the user changes the form, we update the state to reflect the user input. Since components should only update their own state, the parent component will pass callbacks to the child component that will fire whenever the state should be updated. We can use the onChange event on the inputs to be notified of it. The callbacks passed by parent component will call setState(), and the app will be updated.
refrences :